4.5 KiB
Klipper Shake&Tune plugin
This "Shake&Tune" repository is a standalone module from the Klippain ecosystem, designed to automate and calibrate the input shaper system on your Klipper 3D printer with a streamlined workflow and insightful vizualisations. This can be installed on any Klipper machine. It is not limited to those using Klippain.

It operates in two steps:
- Utilizing specially tailored Klipper macros, it initiates tests on either the belts or the printer X/Y axis to measure the machine axes behavior. This is basically an automated call to the Klipper
TEST_RESONANCESmacro with custom parameters. - Then a custom Python script is called to:
- Generate insightful and improved graphs, aiding in parameter tuning for the Klipper
[input_shaper]system (including best shaper choice, resonant frequency and damping ratio) or diagnosing and rectifying mechanical issues (like belt tension, defective bearings, etc..) - Relocates the graphs and associated CSV files to your Klipper config folder for easy access via Mainsail/Fluidd to eliminate the need for SSH.
- Manages the folder by retaining only the most recent results (default setting of keeping the latest three sets).
- Generate insightful and improved graphs, aiding in parameter tuning for the Klipper
Check out the detailed documentation of the Shake&Tune module here. You can also look at the documentation for each type of graph by directly clicking on them below to better understand your results and tune your machine!
| Belts graph | Axis input shaper graphs | Vibrations graph |
|---|---|---|
 |
 |
 |
Installation
Follow these steps to install the Shake&Tune module in your printer:
- Be sure to have a working accelerometer on your machine and a
[resonance_tester]section defined. You can follow the official Measuring Resonances Klipper documentation to configure it. - Install the Shake&Tune package by running over SSH on your printer:
wget -O - https://raw.githubusercontent.com/Frix-x/klippain-shaketune/main/install.sh | bash - Then, append the following to your
printer.cfgfile and restart Klipper (if prefered, you can include only the needed macros: using*.cfgis a convenient way to include them all at once):[shaketune] # result_folder: ~/printer_data/config/ShakeTune_results # The folder where the results will be stored. It will be created if it doesn't exist. # number_of_results_to_keep: 3 # The number of results to keep in the result_folder. The oldest results will # be automatically deleted after each runs. # keep_raw_csv: False # If True, the raw CSV files will be kept in the result_folder alongside the # PNG graphs. If False, they will be deleted and only the graphs will be kept. # show_macros_in_webui: True # Mainsail and Fluidd doesn't create buttons for "system" macros that are not in the # printer.cfg file. If you want to see the macros in the webui, set this to True.
Usage
Ensure your machine is homed, then invoke one of the following macros as needed:
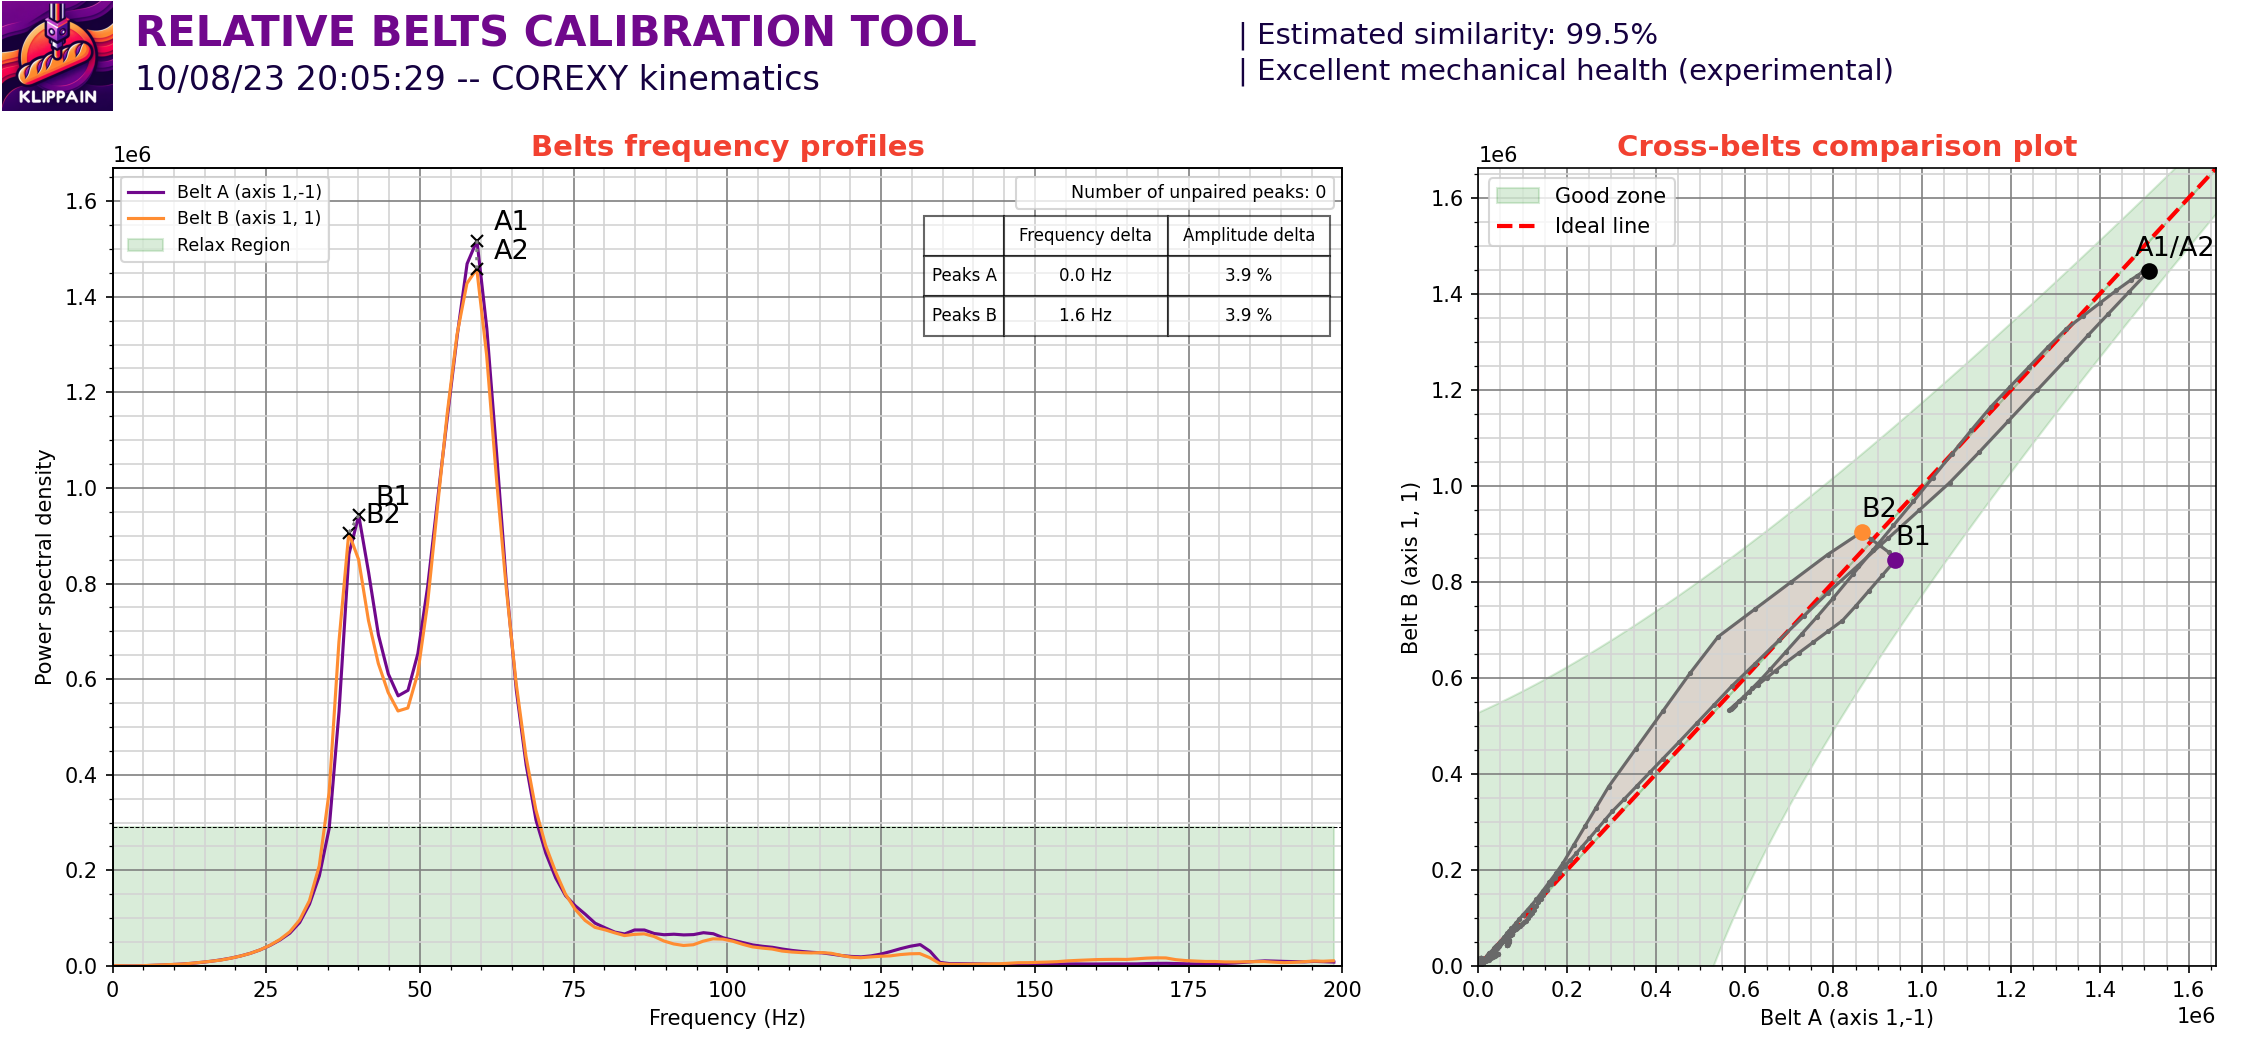
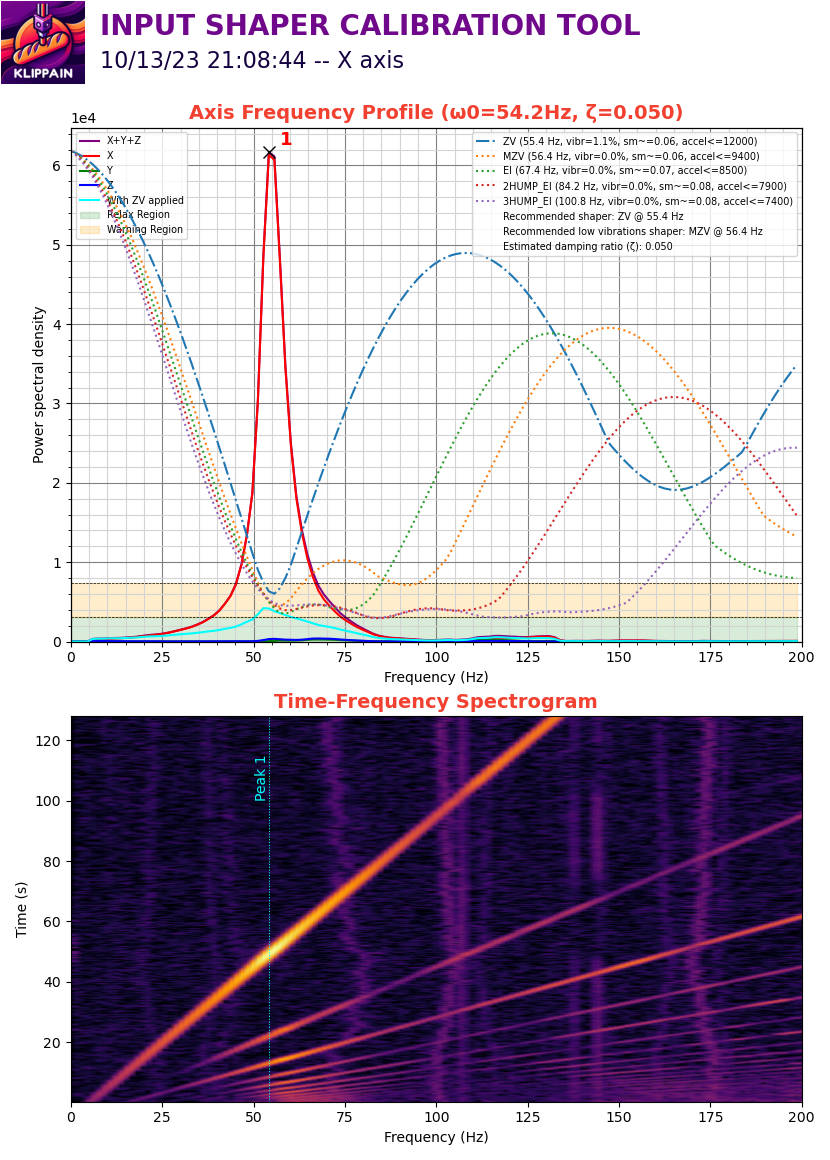
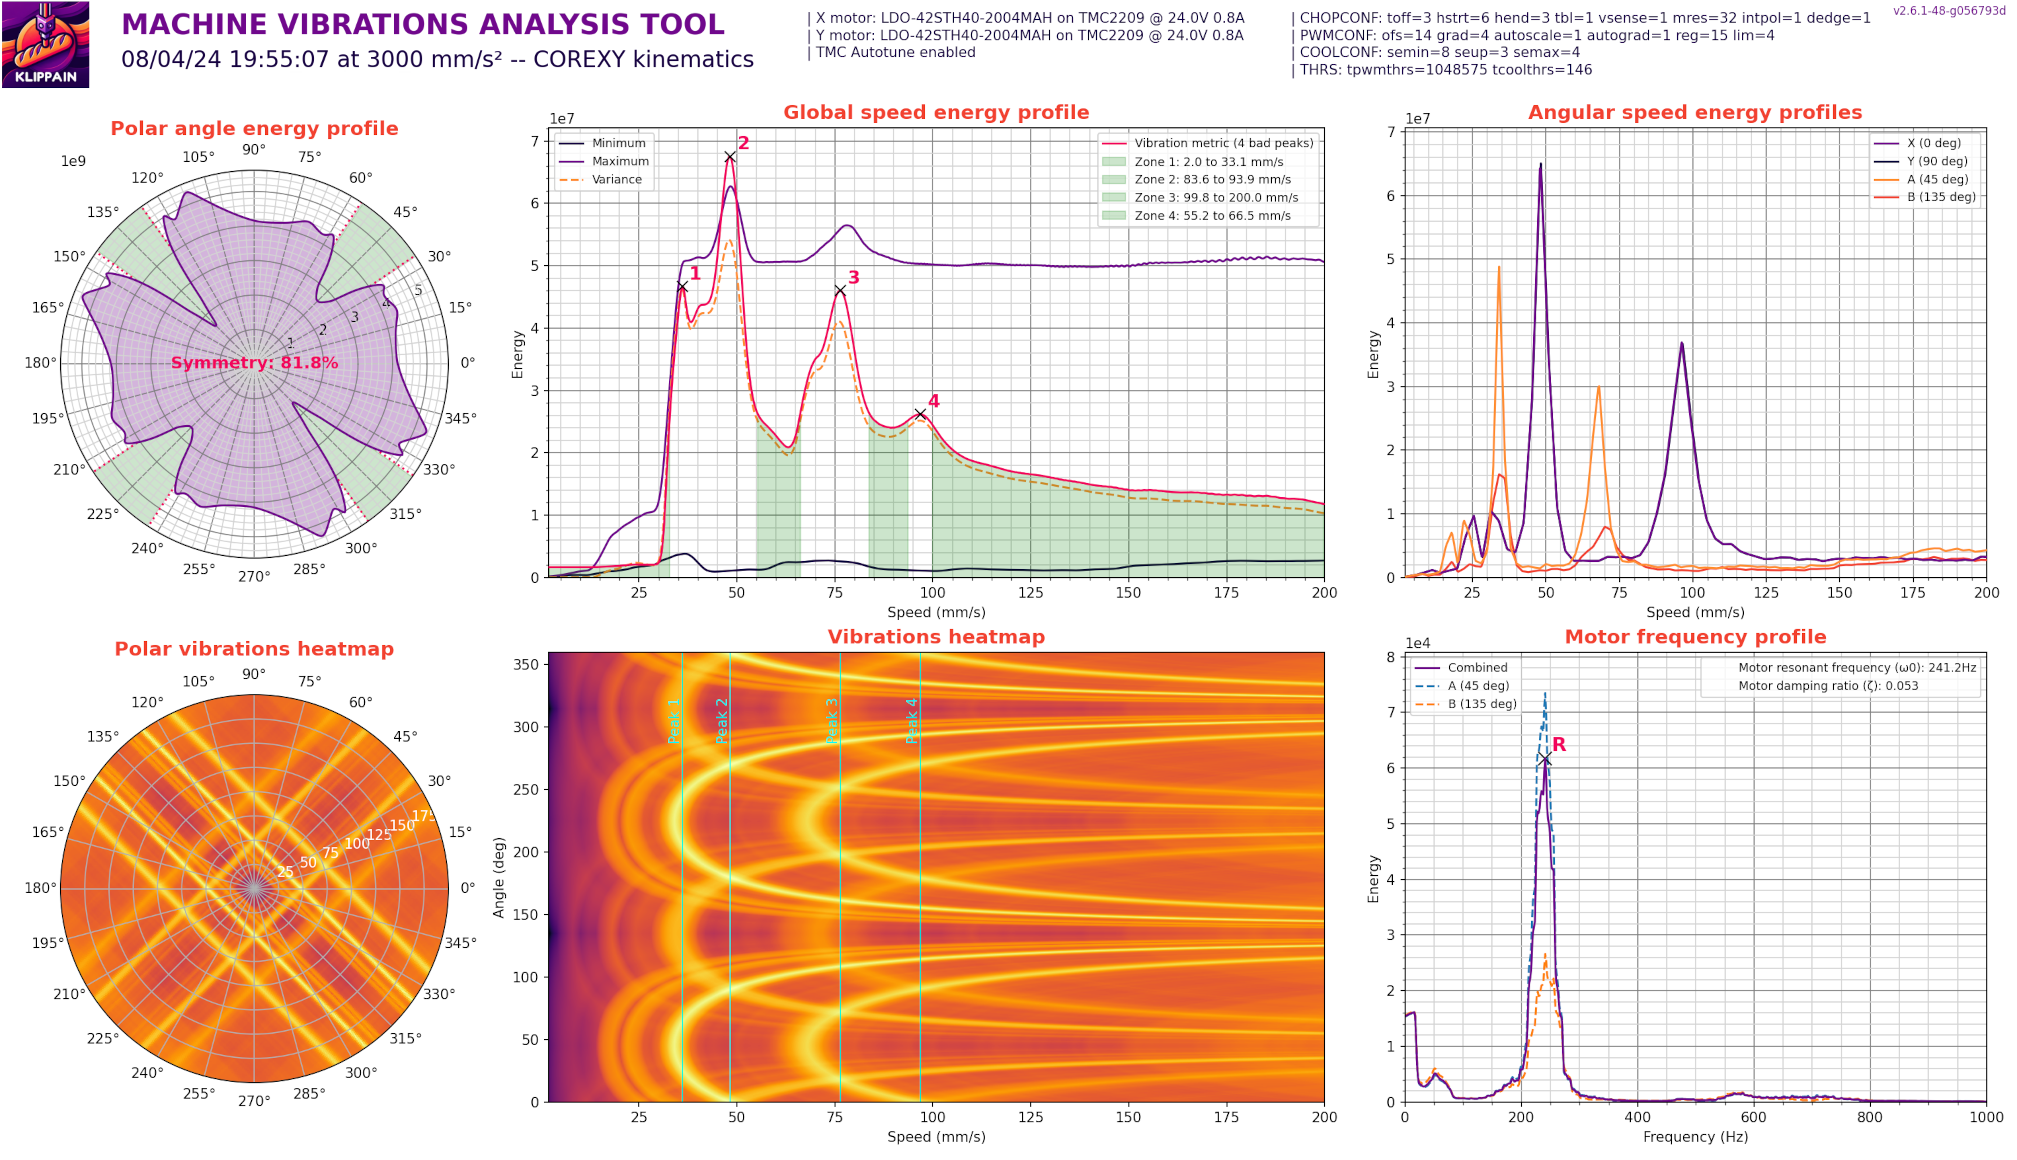
EXCITATE_AXIS_AT_FREQto maintain a specific excitation frequency, useful to inspect and find out what is resonating.AXES_MAP_CALIBRATIONto automatically find Klipper'saxes_mapparameter for your accelerometer orientation (be careful, this is experimental for now and known to give bad results).COMPARE_BELTS_RESPONSESfor a differential belt resonance graph, useful for checking relative belt tensions and belt path behaviors on a CoreXY printer.AXES_SHAPER_CALIBRATIONfor standard input shaper graphs, used to mitigate ringing/ghosting by tuning Klipper's input shaper filters.CREATE_VIBRATIONS_PROFILEfor vibrations graphs as a function of toolhead direction and speed, used to find problematic ranges where the printer could be exposed to more VFAs and optimize your slicer speed profiles and TMC driver parameters.
For further insights on the usage of these macros and the generated graphs, refer to the K-Shake&Tune module documentation.